

“Built not bought” is an expression among custom/performance car people. More pride and satisfaction exists in DIY than in throwing down credit cards. Reality television has glamorized the mundane professions of auto mechanics, chefs, bakers, but not watchmakers. So who wants to be a watchmaker? Rotate Watchmaking Kits thinks you do. Robert Farago said, and I quote, “Better you than me.” So I got their Edison kit . . .
I chose the Edison model with a white dial. It and the black dial Wright model are $6 less than the blue dial goldtone case Galileo model. The pricier, easier, kit names are Eiffel and Newton, continuing the science and engineering appellation mishmash.
[Thomas Edison, the father of R&D, has been vilified by the Nikola Tesla cult of frustrated narcissist nobodies imagining themselves to be secret geniuses exploited by the man. The Edison haterz are such bitter losers, that I will oppose them anyway possible.]
I prefer the smaller series of Rotate Watchmaking kits which are only of “Medium” difficulty level. Medium implies that it is between two things, but it is the simplest available. Rotate claims it should take 2-3 hours to assemble. Their demonstration video is seventeen minutes long. Presumably there is a learning curve.
My experience with watch tinkering comes from keeping my Casio quartz chronograph from college alive. At first battery change, I realized that the mall kiosk worker was just popping the case back off with a knife edge. At some point, a chronograph hand either fell off or got knocked off the home position. Thus I figured out how to remove the crown and stem in order to free the movement from the case. My poor handling here bent the hands so that they hit the hand beneath them. I learned to straighten them out, enough.
The skill set I have thus far: pop a snap case back off, pull a stem, crudely reinstall or adjust hands and put it all back together.
When I got around to opening the Rotate Watchmaking box of watch parts, I was rather expecting a couple sheets of directions. Silly me, surely there is a QR code on the box that will take me there, as with the ridiculous ‘contactless menus’ being used by restaurants. Nope. The DIY ethic extends to typing in the url to access the directions.

As they don’t want you getting your greasy fingerprints all over that pretty movement, which will be visible through the case back, gloves are provided. Nice tough nitrile gloves, so they don’t tear open on first snag like latex. Let’s just say these were not of the “XXXL is one-size-fits-all” school of thinking. I wear a size 8 glove, which is Small. The provided gloves were difficult to don, so most adult males might want to provide their own.
The hand wind movement is provided in a clear plastic container to keep it all clean and undamaged. This container is probably easy to open without gloves on. I’d recommend doing that. Despite the warning to gently place parts (especially the movement) down, I gave up and let gravity dislodge the lid.
The first real step: remove the temporary hands with tweezers. There is a device for pulling and reinstalling hands. I’ve never used one and they don’t provide it. Grab near the center and pull straight up. If this step proves difficult, abort.

Step two, pull that winding stem. The directions talk about loosening the stem 270 degrees while showing the screwdriver in an unmentioned place by the crown. I kept turning the stem while pushing a screwdriver in what I thought was the right hole. So wrong. First of all, now that the hands are off, flip it over and look at the business end. Oops. That’s where the correct screw to loosen can be seen.

Except the provided screwdriver won’t budge it at all. It doesn’t help that the protruding axle means you can’t set the movement down on a table. I have a precision screwdriver set, 16 pieces, none of which are small enough. I also have a box cutter blade, which finally broke her free. This is way more trouble than I was expecting.

Case that movement! Lifting the case from the foam in the box, I realized that the exhibition case back was also inside. Now it was on the floor. Oh well, flip that movement again, because this is done from the front. Insert the stem and it looks like a shift knob above a center console. Trim to fit.
Note that I was smart enough to hold the end that I wanted to keep without them even telling me. The temporary crown (hello dentists) went flying and it’s history. It’s real deal onion crown time now. Screw that on, insert and … still too long. Repeat. And again. I’m fussy, but any gap between the case and crown would be a real fly in the ointment.

It took half a dozen cuts, but I finally I got it tight and right. Checking the operation and… it’s wrong. It’s always setting the time. I think I tripped up the little wind/set lever. The good news is that a quick lift with a tweezer sorted the mechanism. The bad news is that this means I’d chopped the stem when not actually fully inserted. It was too short. That’s what she said.

An hour and a half in, and hello customer service! I sent an e-mail letting them know that, despite not being a total idiot, I’d still done the one thing they warned me not to do. Within an hour, on a weekend, they replied that they’d send a new part. I figure fools do this all the time, and they have a bucket of spare parts for us.
The Rotate Watchmaking e-mail signatures say Jennifer, presumably the one from the instructional video. She must have the patience of a tour guide, answering the same stupid questions with a smile day in and day out. She also explained that every so often that screw is too tight and the screwdriver is not quite sharp enough, so I wasn’t the first one with that issue.
The desired part came later that week, and it was even the right one. Sadly, when I inserted the uncut stem, the same issue was still present: fully in, it adjusts time instead of winding. Like an episode of House, M.D. I realized my diagnosis was incomplete. Play along at home and compare the photo above with the following before photo.
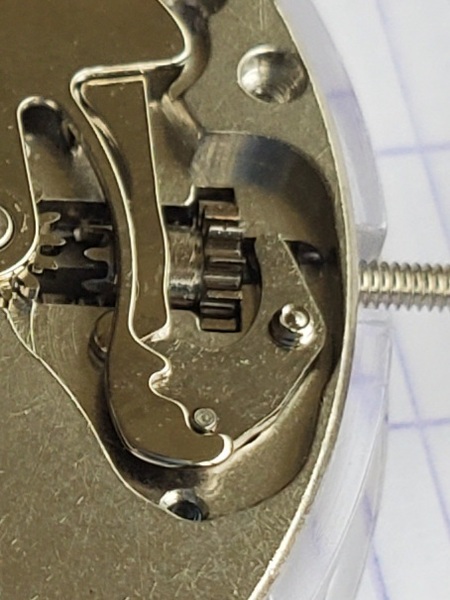
Did you find the problem? If you thought it was something to do with levers and linkages, you were half right, maybe, as was I. But that spur gear at the center… where did it go?

Well, it fell on the ground somewhere last week. I did try looking for the lost gear but I knew that was just a formality. I e-mailed Jennifer on Memorial Day, telling her that it could wait a day or two. She works hard for the money. Within minutes, she confirmed that the piece I needed would be shipped out free of charge. Once again, I was assured that this was not an uncommon mistake.

Tune in next week and see if I can finish the Rotate Watchmaking Kit! Here are my takeaways so far:
- Start with the medium difficulty kit, not that I know what the difference is.
- Maybe read the directions all the way through before starting. Maybe twice.
- Make sure you have some (powder-less!) rubber or nitrile gloves that fit. This will cost about $10 for a box of them unless you know someone that is a mechanic, medical personnel, or a germaphobe.
- The customer service is superb, and they truly are there to make sure the watch gets assembled. My ruining and losing parts won’t stop them.
- Don’t make plans to show off the watch you built before you actually finish it. I thought this would be a single article posting last week.
- Watchmaking is a bit trickier than assembling IKEA furniture
- Robert Farago may have a better self-assessment of his abilities than I do of mine
This content, as always, is unsponsored. Rotate Watchmaking Kits has no idea that I am the famous reviewer Oscar Klosoff.
Correction: Previous mention to the movement being a Seagull automatic has been corrected. The ETA 6497-1 Style Movement is used for the kit reviewed, and the allegedly simpler kit comes with the Miyota 8215 automatic movement.
Continued at Rotate Watches Kit Part 2.
I’ve tried changing the batteries on my cheaper quartz watches, and I’m 2 for 5, so you are way ahead of me at this point. It would be nice to up my game, and get it to the point where I change the battery correctly every time. Maybe baby steps? Like putting Mercedes hands on that Seiko automatic you bought?
Sometimes the case backs are tight and excruciating persistence is required. And you risk warping the back. But once the case back is off, it’s usually a pretty simple affair. A little tool to dislodge the battery (tweezer, knife edge, small screwdriver) helps.
I don’t want to admit this, but before the internet had all information, it didn’t dawn on me to use tweezers to install hands. I’d just lick a finger to adhere the hand and poke around till it centered and stuck. Of course this is how you get bent hands that collide into each other.
Excellent write up. So interesting.
This was Robert’s brainchild. I thought it would be a mundane quickie, but he knew better. I’m expecting the replacement part tomorrow. The fact that I have two strikes in what I’d thought to be the easy steps is rather worrisome. Time will tell if I wrap this up in the second part or if this becomes a prolonged comedy of errors.
Thought the idea clever enough that I sent a family text hinting at my father’s day gift. Couple random things, I think size 8 gloves are on the larger size, 7 average, 6 small. “All tools supplied”? Where’d the “cutting” tool come from and why was cutting metal part of the construction? Maybe I’ve been too grandiose asking for a “hard” model for father’s day, just another reason to get pissed off I guess.
There is yet another foam layer underneath the one shown that has cutouts encasing the gloves, screwdriver, tweezers, pliers/wirecutters, a spring bar tool, and superglue.
It’s something that I had never thought of either, but a completed movement will fit whatever case has the right internal dimensions. But the stem length will vary based on external case dimensions. Apparently bulk movements come with giant long stems and a crummy temporary crown, thus the cut-to-length.
Obviously the vendor could have snipped to the correct size, but they have to leave some fun for the customer. It’s sort of like the old cake mixes. You can have cake mix where all you do is add water. But the baking customers didn’t feel like they were contributing enough to the process, so they changed it up so eggs and milk and all get added at home.
I shoulda just stuck with buying the cake at the baker’s. I’m in for bad father’s day.
It would seem logical to me to insert the stem with the temporary crown, carefully tighten it in, measure the depth of the thread in the new crown, mark the point the stem exits from the case, remove the stem, crop the oid crown off and add the measured depth of the thread in the new crown to the marker made and crop the stem to that length .. would save a lot of trial and error … just follow the old adage of measure twice, cut once!
You think clearer than I did. In fairness, my independent thinking got me in trouble, so minimizing it made sense at the time.
You are correct, of course, as this is exactly what I saw some youtuber called Wristwatch Revival doing yesterday.
https://youtu.be/wgxwOZy6zF8?t=2487